Quizzes
Quizzes are a tried-and-true way to quickly assess how well students have understood the subject material. The advantages of running quizzes within Gameface rather than other options like Google Forms or Kahoot are:
- Quizzes are delivered in real-time in a way that feels very engaging and communal (see below)
- Quiz scores can be used to form groups that are optimized for peer learning (see Forming effective groups)
- Quiz scores can easily be combined with other measures to track student participation and understanding.
If you are following a flipped learning approach then it's a great idea to start each class with a quick quiz. It quickly sets the tone that students should be preparing well before they come to class.
Use quizzes to quickly assess student's knowledge/mastery prior to forming groups. This will allow you to form groups that support peer learning well (by ensuring each group has at least one knowledgeable group member).
Creating quizzes
Quizzes need to be planned out before the class starts, since they take a bit of time to set up. You can create new quizzes and view/edit existing quizzes by navigating to a particular course, and then to the Quizzes tab.
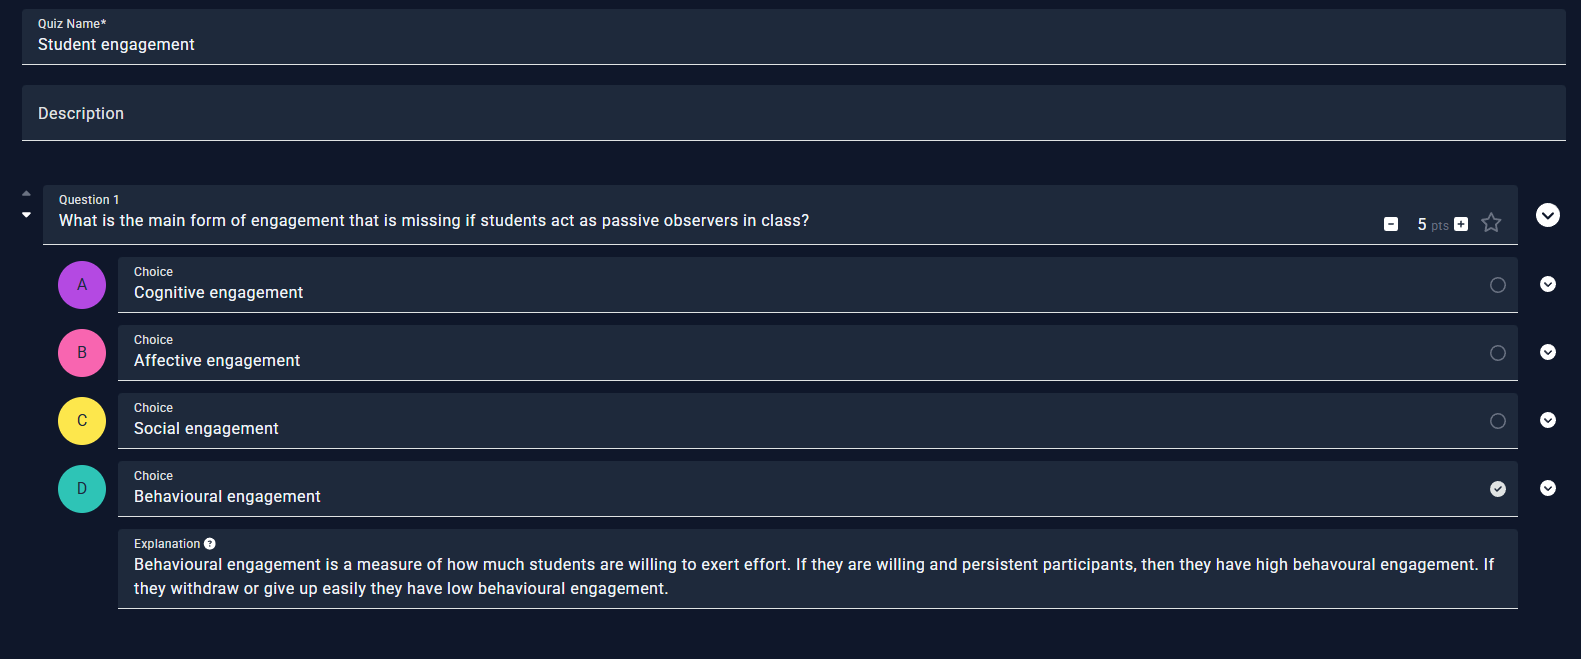 |
| Figure 1: Creating a quiz |
Figure 1 shows a quiz that is under construction. You can add as many quiz questions as you want, and each question can have between two and six possible choices, one of which must be marked as the correct choice.
The text box with the heading Question 1 contains the text of the question. On the left of this box are directional arrows to reorder questions if necessary. Within the right part of this box are controls to increase or decrease the points that will be earned by students when this question is answered correctly, and a icon to toggle whether this question is a bonus one or not (see here for more information about bonus activities). The button to the right of that provides a menu with options to delete or duplicate the question.
Below this are text boxes for entering the possible choices; each question must have between two and six possible choices. Within the right part of each text box the button can be toggled to a to indicate which choice is the correct one. The button to the right of that provides a menu with options to delete or reorder the choice.
Below the choices the Explanation text box provides a place for you to explain the correct answer. These explanations will be available to teaching staff within the remote control while the question is being asked in class. They are never revealed to students.
You can use formatting (i.e. bold, italic, code blocks etc) in questions, choices and explanations. Clicking on these will reveal the familiar text-editor controls.
Running a quiz
Once a quiz is created it can be launched within an active room from either the presenter view or the remote control by opening the main menu and selecting Start quiz.
A popup will open that allows you to specify whether the quiz should be completed individually or in groups, and selecting which specific quiz you want to launch.
Keep an eye on how many students have responded to a question (shown on the presenter view). Use this information to know when to close the question, and whether you need to orally paraphrase or clarify the question.
Pause after revealing each answer. If a lot of students have chosen the incorrect answer, spend some time identifying and correcting the underlying misunderstanding that would have led to this.
If you have a team of tutors then make sure you provide a good explanation for each answer so they can do this consistently.
Alternatively, use a volunteer task to invite students to explain why the correct option is correct (or why the others aren’t). This supports metacognitive thinking, reinforces key concepts, and encourages students to articulate reasoning out loud — all while maintaining an atmosphere where correctness is clarified through discussion rather than judgement.